
OST (Offline Outlook data file) stores a local copy of mailbox items, such as emails, attachments, contacts, tasks, calendars, etc. When Outlook is set up using an Exchange, Microsoft 365, or IMAP account, OST file is created automatically. This offline Outlook data file allows you to access your Outlook account and do the changes even when the system is offline. The changes are synchronized with the mail server when the internet connection is restored.
Though rebuilding the OST file is not required usually, sometimes situations arise when you may need to rebuild the OST file. Here are some of them:
- OST File Corruption: OST files can get corrupted due to abrupt system shutdown, hardware issues, malware or virus intrusion, sudden power outages etc. Corruption in OST files can prevent Outlook from working properly. In such a situation, you need to rebuild the Outlook OST file.
- Synchronization Issues: Many a times, synchronization issues occur between OST file and Exchange Server. It can lead to missing or outdated data in your mailbox. Rebuilding the OST file can resolve the issues and enable proper accessibility of Outlook items.
- Migration or Moving Data: When migrating to a new system or server, it may be required to rebuild the Outlook OST file to ensure that the file is synchronized properly.
How to Rebuild the OST File?
Below, we will discuss different ways to recreate OST file.
Note: Take a backup of Outlook data before rebuilding the OST file, in case something happens during the process.
Method 1: Delete OST File and Recreate It
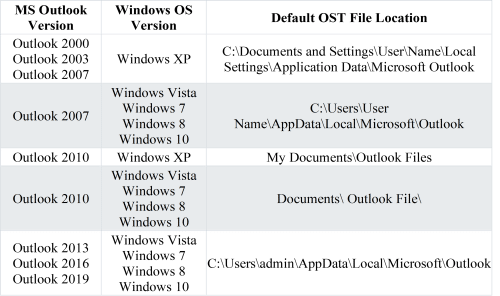
It is simple to recreate the OST file. You can just delete the OST file from the default location and Outlook will recreate it. However, to delete the OST file, you must know its default location on your system. The below table shows the default OST file location in different Outlook versions.
Alternatively, you can follow the below steps to find the OST file location.
For Outlook 2007:
- Step 1: Launch the Outlook application and open the Tools tab from the menu bar.
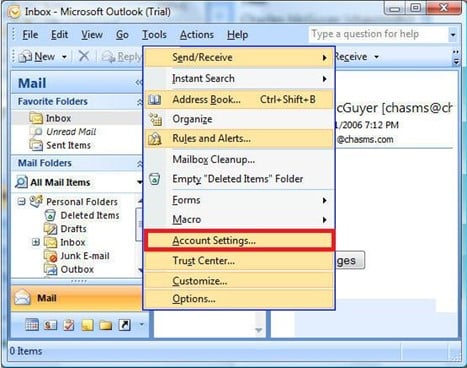
- Step 2: Select the Account Settings option from the dropdown menu. It will open a new window.
- Step 3: Click the Data Files tab and select your OST file. Click the Open File Location option.

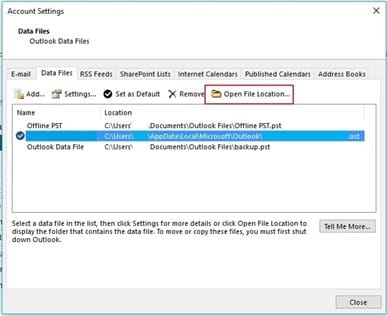
For Outlook 2010 and Later:
- Step 1: Launch the Outlook application and click on the File tab. Proceed to the Info section from the left panel.
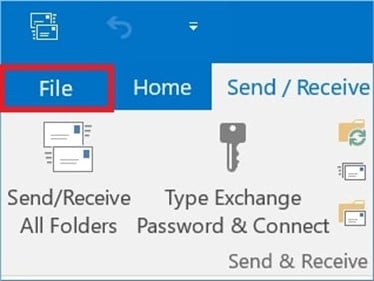
- Step 2: Select the Account Settings option. It will open a new window. Then, click the Data Files tab and select your OST file. Click on Open File Location. It will lead to the respective folder where the OST file is stored.
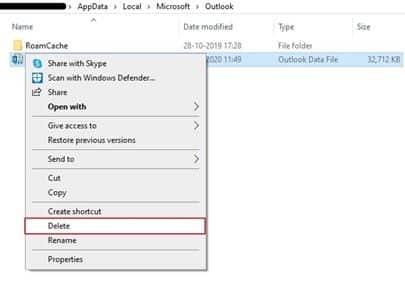
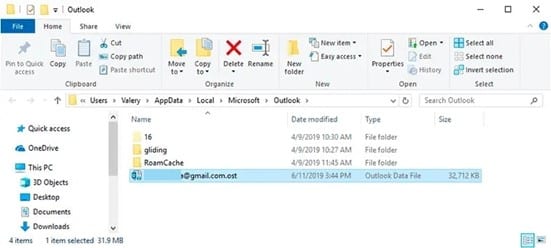
Once you found the OST file location,close all the Outlook services on your system. Then, go to the OST file location, right-click on the OST file and delete it.
Now, open your Outlook. It will create a new OST file at the default location and download all your mailbox data from the server.
Method 2: Rename the OST File
If you don’t want to delete the file, you can just rename it. Outlook will then create a new OST file at the same location. Follow the below steps.
- Step 1: Close all services of Outlook and go to the OST file location.

- Step 2: Right-click on the OST file and select the Rename option.
- Step 4: Add .bak or .old at the end of the file. Relaunch the Outlook application to rebuild the OST file.
Method 3: Use Cached Exchange
The Cached Exchange mode enables an offline copy of your mailbox in the form of an OST file. Below are the steps to enable Cached Exchange Mode in Outlook:
- Step 1: Go to Microsoft Outlook and then click on the File menu.
- Step 2: Select “Account Settings” and then again choose “Account Settings”.
- Step 3: Select the email account for which you want to rebuild the OST file.Click on “Change” option.
- Step 4: In the Change Account window, check the box “Use Cached Exchange Mode” and click “Next”.
- Step 5: Click Finish to complete the process.
- Step 6: Close Outlook and relaunch it.
Conclusion
If you’re facing issues with your OST file or if it is corrupt, you can recreate the OST file to resolve the issues. You can follow the above-mentioned methods to recreate the OST file. However, it is important to take a backup of your existing OST file before rebuilding. After rebuilding the file, check for any missing mailbox items. If you found any missing items after recreating the file, you can restore them from the backup file. For this, you can use Stellar Converter for OST. The software can extract the missing items from the backup OST file and save them in a PST file. You can import this PST file into your Outlook account to restore the items. The software also comes in handy when the OST becomes inaccessible or orphaned. It can easily convert such files into PST, thus helping you to restore your important mailbox data.